Oil pump VR6
Removal and installation
Remove the oil pan to gain access to the Transporter T4 .
To do this, it is recommended to raise the front of the car on the goats or install it on a flyover or pit. ♦ By unscrewing the bolts securing the oil pump housing and the oil pick-up tube.
♦ Pull the pump down until its drive shaft disengages, then remove the pump completely.
♦ If replacement of the drive gear is necessary, unscrew the bolts and remove the cover.
The cover is sealed with an O-ring. Remove the gear with a collet. The pump is installed in the reverse order. The pump without gaskets is installed on the cylinder block, cover the flange of the oil intake pipe with sealant AMV 188 001 02. Tighten the oil pump mounting bolts, tightening torque 25 Nm; bolts of fastening of an oil receiving tube tighten the moment of 10 Nm. The oil pump drive shaft must mesh well with the drive wheel housing. If you removed the pinion gear, then insert it into the corresponding hole from the top side so that it engages with the gear on the countershaft. Lubricate the cover with a new sealing ring with engine oil before installation. Tighten the bolts, tightening torque 10 Nm. Install the oil sump as described above, tighten the drain plug, tightening torque 50 Nm.
Repair
If the pump no longer creates the desired pressure in the system, then most often it needs to be replaced. The pump, however, can be disassembled to check the pump gears to determine how badly worn both the gears and the pump housing are. There is a safety valve in the pump cover, which can also cause a malfunction. When disassembling the pump, use fig. 177.
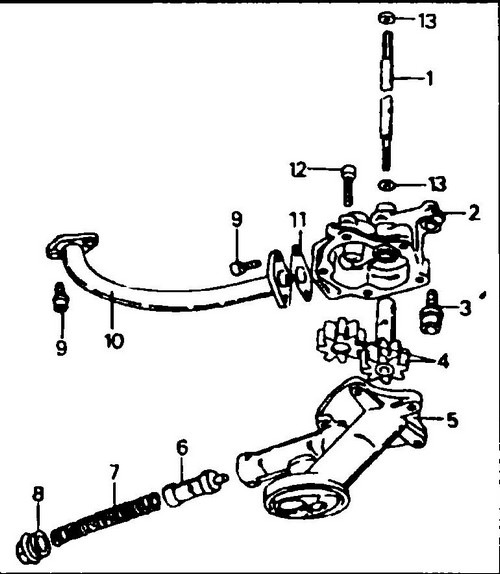
Rice.
177 Oil pump device: 1 - drive shaft, 2 - pump housing, 3 - hexagon socket bolt, 25 Nm, 4 - gears, 5 - cover with safety valve, 6 - safety valve plunger, 7 - spring, 8 - screw plug safety valve, 40 Nm, 9 - bolt, 10 - oil pickup tube, 11 - gasket, 12 - bolt, 10 Nm, 13 - o-ring
♦ Remove the screws from the top and bottom of the pump housing and remove the cover from the pump housing.
♦ Remove the two bolts and remove the oil pickup tube from the pump housing.
Between the pipe flange and the pump housing there is a gasket that needs to be changed. ♦ Remove the pump drive wheel with shaft and the gear without shaft from the housing.
You can also remove the drive shaft. This shaft is sealed with two O-rings, which must be replaced with each disassembly. Thoroughly clean all parts before checking. ♦ Check the condition of the oil pump housing.
If the gear seats are worn out, the pump assembly must be replaced. ♦ Check gear wear.
The gap should not exceed 0.05-0.20 mm. If the gap is greater, the gears must be replaced in pairs. In this case, it is better to replace the pump assembly. The axial clearance of the gears should not exceed 0.06-0.10 mm.
Oil pump gears can only be changed in pairs.
The wear of the tooth flanks most often represents the shiny surfaces of the work-hardened material. ♦ Carefully secure the pump cover in a vise and unscrew the safety valve plug.
Remove the valve spring and plunger. The protrusion of the plunger is directed into the pump. Keep this in mind when assembling. Carefully check the valve and spring. The opening pressure of the valve is 5.5 ±0.2 bar and is not recommended to be measured. If you find instability in oil pressure before disassembling the pump, it is easier to replace the valve. When assembling the pump, remember that the seating surfaces must be carefully cleaned. Lubricate all parts with engine oil before assembly. Be especially careful that the pump gears are lubricated, otherwise they may jam during the first start. Tighten bolts with hexagon socket head (3) installed from below to 25 Nm; tightening torque of bolts (12) mounted on top -10 Nm. Check that the gears rotate easily before installing the pump on the block. ♦ Replace both pump drive shaft O-rings before installing the shaft into the gear.
♦ Lay a new gasket on the pump seat, install the oil pick-up pipe, fix the pipe with bolts, tightening torque of the bolts is 10 Nm.
Cover the pipe flange that is attached to the crankshaft housing with sealant AMV188 001 02 before installation . Install the spring and screw in the plug (8). Place the pump carefully in a vise and tighten its plug with a tightening torque of 40 Nm.
Volkswagen Transporter T4 engine . Specifications Conveyor T4 .