Front bumper - removal and installation
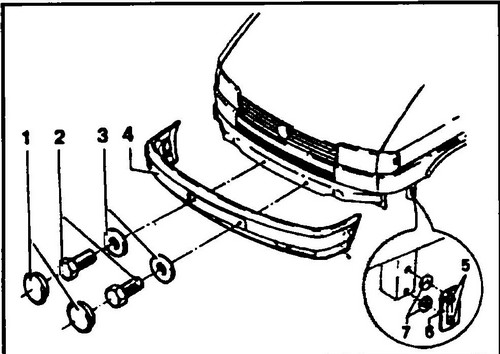
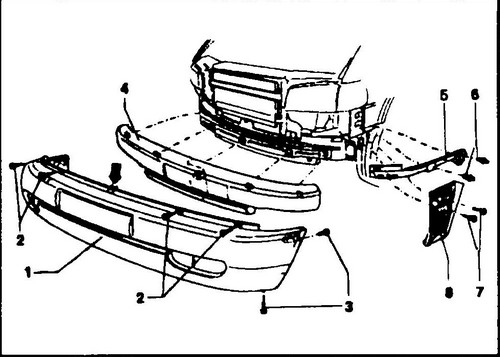
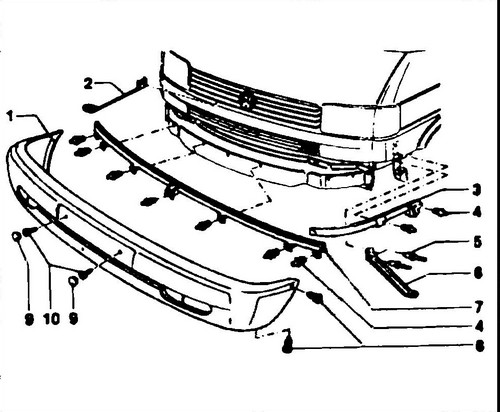
T4 front bumper was changed at the end of 1995. The design and fastening of the front bumper of older models, see fig. 461, new, fig. 462 and 463.
Rice.
461 Removal and installation of the front bumper - Transporter T4 models up to 1996 1 - decorative caps, 2 - bolts, 3 - washers, 4 - front bumper, 5 - pins, 6-guide, 7 - rubber washers
Rice.
462 Removal and installation of the front bumper - models from 1996 1 - bumper, 2 - T30 wrench bolt, 6 Nm, 3 - T25 wrench bolt, 1.2 Nm, 4 - bumper bracket, 5 - guide, 6 - caps, 7 - screws, 1.5 Nm, 8 - bumper side bracket
Rice.
463 Removal and installation of the front bumper - models from 1996 1 - bumper, 2 - bumper bracket (brace), 3 - guide, 4, 7 - piston, 5 - rivets, 6 - bumper side bracket (brace).
Removal
Pre-1996 Models
♦ Remove the caps (1) with a screwdriver.
♦ Loosen the screws (2), remove the screws with washers.
♦ Pull the bumper off the side rails on the left and right in a pulling motion.
Installation is carried out in the reverse order.
Removal
1996 Release Models - Long Front
♦ Remove the grille.
♦ Remove screws (2) and (3), two Torx wrenches (T30 and T25) are required.
♦ Carefully detach the bumper from the central stop (see arrow in Fig. 462).
Pull the bumper off the side rails. ♦ When dismantling the bracket (4), which serves to dampen the impact energy in a collision, it is recommended to first detach the right and then the left halves.
Installation is carried out in the reverse order; during installation, check the fixation of the central stopper.
Models since 1996 - short front
♦ Using a screwdriver, remove the decorative caps (9, fig. 463), remove the screws (8) and (10).
♦ Carefully pull the bumper off the rails and clips.
Installing the T4 front bumper is done in reverse order.


