Replacing mechanical clutch parts
On fig. T4 mechanical clutch drive device with a self-adjusting pedal free play mechanism. Using fig. 326 you can do all the work on this mechanism.
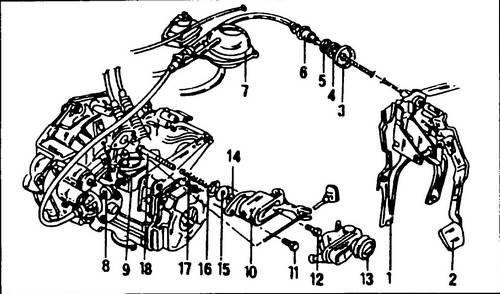
Rice.
326 Clutch control mechanical drive device 1 - pedal bracket, 2 - clutch pedal, 3 - belleville washer, 4 - fastening nut, 5 - sealing ring, 6 - clutch rod sheath with clutch pedal free play adjustment device, 7 - clamp securing the sheath cable, 8 - rubber stopper, 9 - bracket, 10 - angle arm housing, 11, 12 - bolts, 25 Nm, 13 - rubber boot, 14 - lock washer, 15 - washer, 16 - gear washer, 17 - spring, 18 - pusher
♦ Before dismantling the angle arm housing (10), disconnect the clutch rod.
♦ Before unscrewing the bolt (11), engage reverse gear.
♦ Place the lock washer (14) on the pusher (18) at a distance of 8 mm from its end.
♦ The toothed washer (1) must be wedged into the body by striking the tubular rod over the washer (2)
♦ The washer (15) must be replaced at each assembly.
After installing the washer (16), check that the washer (15) moves freely. The shaped washer (16) is disposable, replace it during assembly. In order to remove this washer, you must first remove the pusher, then in the order shown in fig. 327, insert the washer (2) into the housing, and then the toothed washer (1), with the concave surface towards the washer (2). Drive the washer (1) with a tubular rod so that it is wedged in the housing bore and does not restrict the free movement of the washer (12).
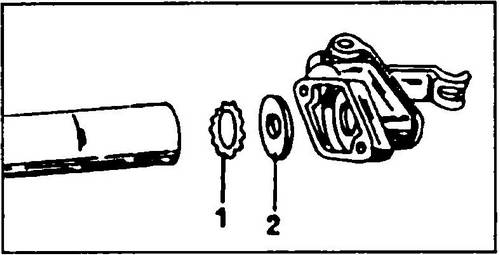
Rice. 327 Installation of a figured washer in models with a mechanical clutch drive