Checking the fuel pump check valve
♦ Close the pressure gauge valve (see fig. 249).
♦ Press the remote control button for short periods of time to pressurize the system to 3 bar.
If the pressure exceeds 3 bar, open the tap and reduce the pressure. ♦ If an overpressure of 3 bar is maintained for a minute, the fuel line connections and the non-return valve are tight.
♦ Check pressure drop over 10 min.
The pressure must not fall below 2 bar. Otherwise check tightness of places of connection of fuel lines. ♦ If the connections are sealed, replace the fuel pump assembly with check valve.
♦ Disconnect the remote control button.
♦ Attach the fuel gauge guard.
♦ Fix the floor covering with adhesive tape.
Checking the fuel pump relay
The fuel pump relay needs to be checked if the fuel pump is not working.
♦ First check fuse No. 18 of the fuel pump.
Replace defective fuse. ♦ Remove the fuel pump relay from the panel (location no. 12) (see fig. 252).
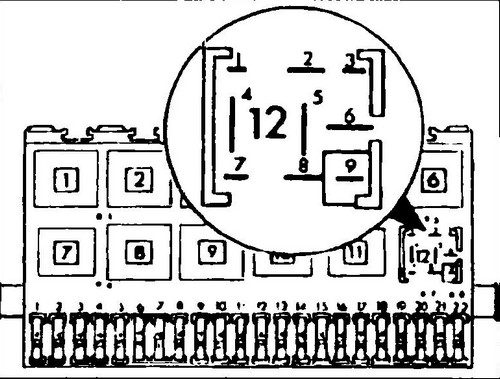
Rice. 252 Location of the relay and fuse of the fuel pump
♦ Switch on the ignition.
♦ Using a test lamp, check the presence of voltage on contacts (6), (2), between contacts (6) and (4)
♦ If there is no voltage on any terminal, it is necessary to find a break in the wiring and eliminate it.
♦ Switch off the ignition.
♦ Connect a test lamp to contacts (2) and (3).
♦ Switch on the ignition. The lamp should light up for 1 second, otherwise it is necessary to check the wiring going to the Digifant . The cause of the malfunction is a damaged circuit or a damaged microprocessor module.
Replacing the fuel pump T4 .