Crankshaft and main bearings
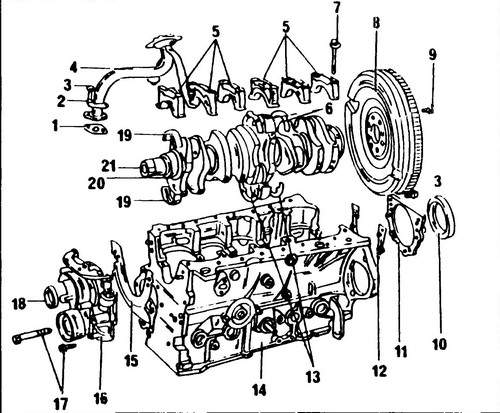
The crankshaft and the entire connecting rod mechanism of the 1.9L engine is identical to those of the four-cylinder petrol engine. The device of the block of the five-cylinder engine T4 is shown in fig. 217.
Rice.
217 Five-cylinder engine block 1 - gasket, 2 - safety washer, 3 - bolt, 10 Nm, 4 - oil pump downpipe, 5 - main bearing cap, 6 - lower support half ring, 7 - main bearing bolt, 65 Nm, 8 - flywheel, 9 - flywheel bolt, 10 - crankshaft rear oil seal, 11 - rear oil seal flange, 12 - flange gasket, 13 - upper support half ring, 14 - engine housing, 15 - oil pump gasket, 16 - oil pump, 17 - bolts, 18 - crankshaft front oil seal, 19 - main bearing, 20 - oil pump clamp, 21 - crankshaft
MEASUREMENTS OF CRANKSHAFT END CLEARANCE
Before dismantling the crankshaft, for which it is necessary to remove the engine from the car, it is necessary to measure the axial clearance in order to know whether it will be necessary to replace the central bearing support rings during assembly.
In case of excessive wear of the corresponding surfaces, the shaft will have to be replaced. The measurement method is the same as for a petrol engine (see section 2.1.5). The axial clearance should be within 0.07 - 0.17 mm. The maximum clearance cannot exceed 0.37 mm for a four-cylinder engine and 0.25 mm for a five-cylinder engine. DISMANTLING THE CRANKSHAFT
The removal of the crankshaft of a four-cylinder engine is carried out basically according to the instructions given earlier, with the difference that it is necessary to remove the injection pump.
The timing belt must be removed according to the instructions given in the relevant section. In a five-cylinder engine, in addition to the above, it is necessary to remove the oil pump. Recommendations are given in the relevant subsection. Engine main bearing caps are numbered. The first number has a cover on the drive pulley side, and number 6 has a cover on the flywheel side. If the covers are not numbered, they must be marked before starting disassembly. Half liners installed in the block have oil holes. An oil pump drive collar is installed at the end of the crankshaft. Remove it from the shaft only when replacing the shaft. Before installation on the crankshaft, the drive collar must be heated to a temperature of 200ºС. REPLACING CRANKSHAFT OIL SEALS
The front and rear oil seals or oil seal cap assemblies must be replaced each time the crankshaft is removed.
This requires special equipment and special precautions. The oil seals of a four-cylinder engine are replaced in the same way as in a gasoline engine. In this case, it is necessary to use the same special devices. In a five-cylinder engine, given that the oil pump is located on the crankshaft axis, the oil seal is replaced a little differently. FRONT OIL SEAL
♦ To replace the front oil seal, it is necessary to remove the V-belt, toothed belt cover, toothed belt, belt pulley with toothed pulley and power steering pump with V-belt.
♦ It is best to use the tool shown in fig.
218. In the absence of it, the gland can be carefully removed with a screwdriver. ♦ After the engine is removed from the vehicle, remove the oil pump along with the oil seal. The gland in this case is removed in the same way, but the operation is greatly simplified.
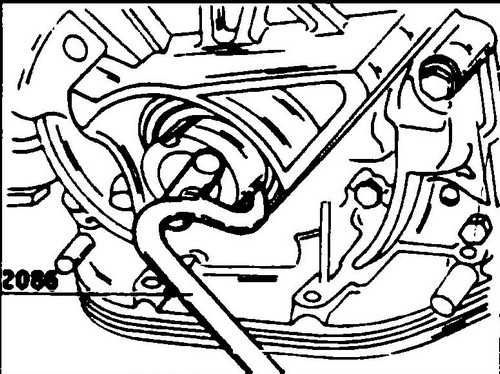
Rice. 218 Removing the front crankshaft oil seal
In the engine outside the vehicle, install the new oil seal as follows:
♦ Lubricate the sealing lip as well as the perimeter of the oil seal with clean engine oil and carefully install the oil seal into the oil pump housing.
♦ Install the oil pump as described in the appropriate subsection.
♦ Install all previously removed components and parts in reverse order.
♦ In an engine on a car, the oil seal installation sequence is as follows:
♦ When installing the front oil seal, use the special tool.
This tool can be made by yourself ♦ Fit the clamping sleeve to the oil seal and screw the bolt into the crankshaft, thereby pressing the oil seal into the seat as shown in fig. 219.
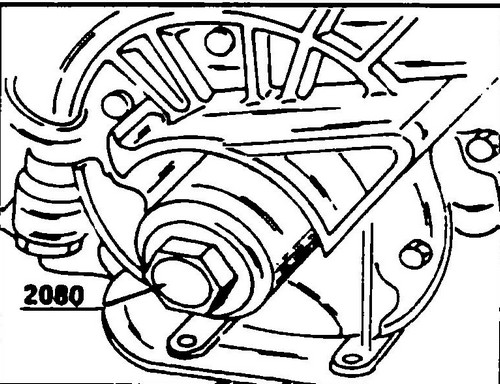
Rice. 219 Installing the front crankshaft oil seal
REPLACING THE REAR OIL SEAL
♦ To replace the rear oil seal, disconnect the transmission
Volkswagen Transopter T4 ♦ To remove the oil seal, use the tool shown in fig.
219. You can remove the oil seal with a screwdriver, but you must be very careful not to damage the crankshaft. ♦ If the engine is removed from the vehicle, remove the rear cover with oil seal assembly (Fig. 217 shows the features associated with attaching this cover), then knock the oil seal out from the back of the cover.
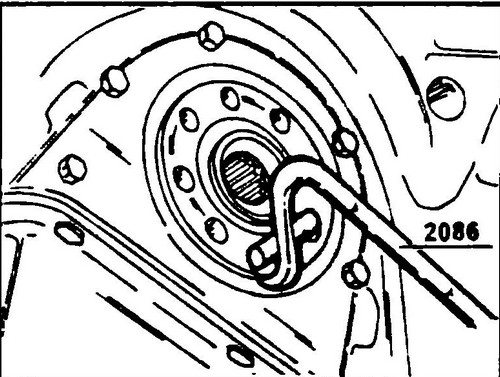
Rice. 220 Crankshaft rear oil seal remover
The new oil seal is installed as follows:
♦ If the engine is removed from the vehicle, the oil seal can be carefully installed into the cover with a wooden hammer handle.
♦ Then install the cover with a new gasket on the engine block, finally tightening the bolts to 10 Nm.
♦ If the engine is in a car, then the rear oil seal is installed using tool 2003/1 shown in fig. 221 or a specially prepared record. This plate should have a hole in the middle for the crankshaft bolt and two holes for the clutch bolts with which it will be screwed. Lubricate the lip and outer surface of the oil seal with engine oil and place the oil seal against the hole. Install the tool, and then, tightening the bolts evenly, install the oil seal in the hole in the cover.
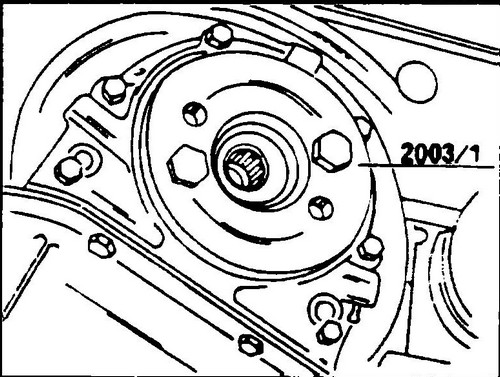
Rice. 221 Installing the crankshaft rear oil seal
Checking the crankshaft, as well as main and connecting rod bearings
The crankshaft of a diesel engine is checked in the same way as the shaft of a gasoline engine.
It also describes how to measure main and connecting rod bearing clearances. If the main bearing clearance is greater than 0.08 mm, replace the bearings. When doing this, do not forget to check if the necks have not been previously sanded. INSTALLING THE SHAFT ELBOWS
♦ Clean the main bearing holes and install the half bearings with the oil hole in them.
♦ Install support rings to the left and right of the center bearing.
Carefully make sure that the locking tabs fit exactly into their selections. Lubricate all parts liberally with clean engine oil. ♦ Carefully place the crankshaft on the half shells.
If the connecting rods remained in the cylinders, insert them now onto the connecting rod journals. ♦ Place the lower half-shells in the corresponding crankshaft caps (protrusions in recesses) and lubricate their surfaces liberally with clean engine oil.
Install the support half ring into the middle bearing cover. ♦ Install the main bearing caps and tap them with a rubber or plastic mallet.
♦ Tighten the main bearing bolts one by one in several passes.
Start tightening with the middle bearing, finally tighten the bolt to 65 Nm. After tightening the main bearing caps, rotate the crankshaft several times to make sure the shaft rotates freely. ♦ Recheck the crankshaft end play as described in the petrol engine section.
♦ Install pistons and connecting rods.
♦ Install both crankshaft seals.
♦ Install the toothed belt and its cover.
♦ Install the flywheel according to the previously marked marks.
Always use new bolts when doing this. Coat the bolt threads with D6 threadlocker. The tightening torque is only 30 Nm, but then the bolts must be further tightened by a quarter of a turn. ♦ Fit the clutch to the flywheel.
The clutch disc must be installed coaxially with the crankshaft. Tighten the bolts securing the clutch covers evenly and crosswise to a torque of 20 Nm. ♦ On a five-cylinder engine, install the oil feed pipe (if removed).
During installation of the oil pump, it is necessary to replace its gasket. ♦ Lay a new oil pan gasket on the engine block and install the oil pan.
Tighten the fastening bolts to a torque of 20 Nm. Screw in the oil drain plug with a new sealing ring and tighten to 50 Nm. Perform all other steps in reverse order.
Fundamentals of safe operation Transporter T4. The device and replacement of the ignition lock Volkswagen Transporter T4.