Bonnet cover - removal and installation
Models before 1996 - Removal
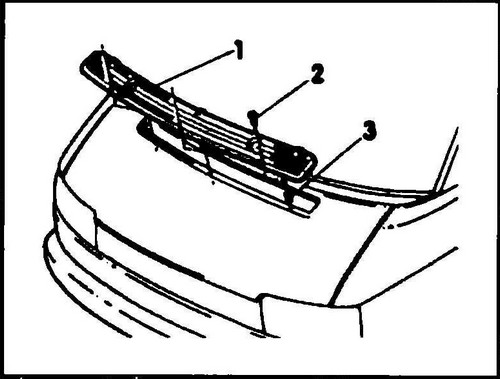
♦ Remove the ventilation grille (1, see fig. 469) by unscrewing the 3 Phillips screws (2).
Rice. 469 Hood grill attachment - models up to 1996 release
♦ Disconnect the washer hose from the nozzles and from the hood and remove it from the vehicle.
♦ If necessary, remove the T4 bonnet soundproofing as described below.
♦ If equipped, remove the engine compartment lamp.
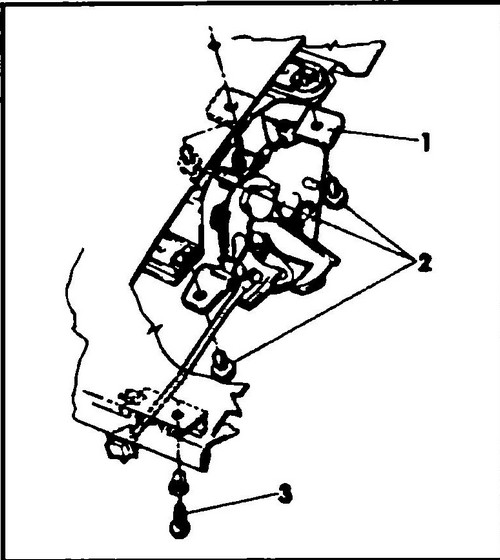
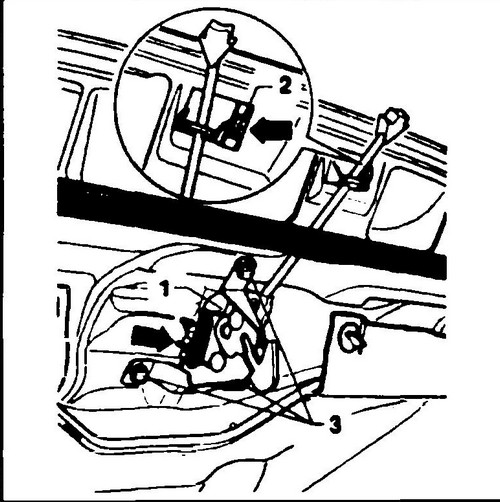
♦ Remove the bonnet latch (1, see Fig. 470) by unscrewing the cross-head screw (3) and hexagon bolts (2). Disconnect the lock cable from the hood.
Rice. 470 Hood lock Transporter T4 - models up to 1996 release
♦ If the hood is to be reinstalled, circle the hinge bolt heads with a felt tip pen to facilitate subsequent assembly.
♦ Remove the bolts holding the hinges.
The assistant must hold the hood. Place rags on the front fenders so as not to damage the coating. Remove the hood. Installation
♦ Bolt the hinges, do not overtighten the bolts.
♦ Close the T4 hood and align it by moving it in the opening.
♦ Carefully open the hood and tighten the hinge bolts.
♦ Route the hood lock rod in the clips and insert into the lock.
♦ Connect the hoses to the windshield washer jets and route the hoses to the original mountings in the hood.
♦ If equipped, install the engine compartment light and hood soundproofing.
♦ Insert the ventilation grille and fix it with three screws.
Replace defective nuts (3) (see Fig. 469). Models manufactured since 1996 - removal
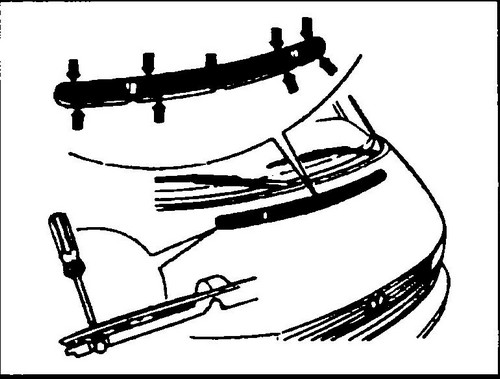
♦ Detach the ventilation grille, see the attachment points in the direction of the arrow in fig. 471. To do this, press the protrusions with a small screwdriver.
Rice. 471 T4 hood grill attachment points
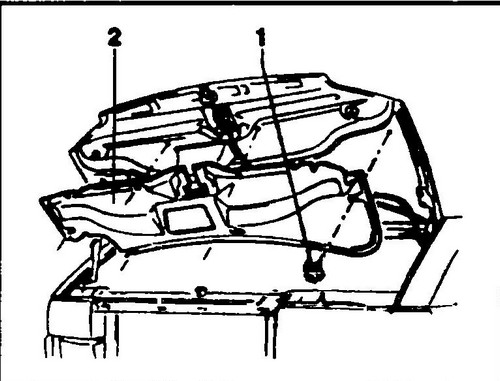
♦ Vehicles with soundproofed bonnet cover: open the bonnet, turn it 60º and remove the clips (1, Fig. 472).
Rice. 472 Clamps soundproofing the hood
♦ Remove the acoustic cover (2).
♦ Press the latch tab (2) of the bonnet lock lever (see Fig. 473) in the direction of the arrow and disengage the latch from the hood cover.
Rice. 473 Removing the hood stop Conveyor T4
♦ Mark the installation position of the bonnet lock.
To do this, the bolt heads (3) must be circled with a felt-tip pen. ♦ Remove screws (3).
♦ Remove the bonnet latch (1) and disconnect from it (see arrow).
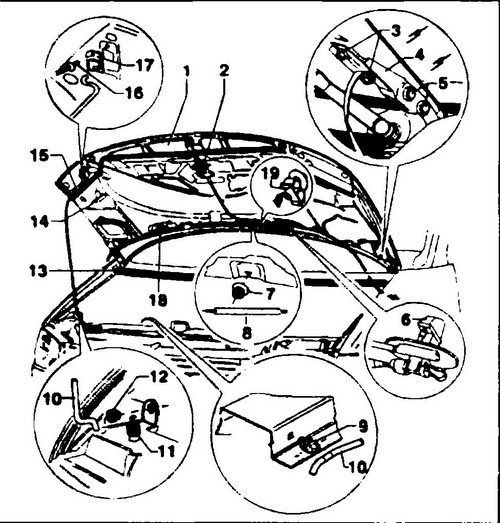
♦ Disconnect the lock drive linkage, windshield washer hose and wires of the electric washer nozzle heating system from the hood (see Fig. 474).
Rice.
474 Attachment points for the hood cover - models from 1996 1 - hood cover, 2 - hood lock, 3 - bolts, 25 Nm, 4 - hinge, 5 - bolts, 85 Nm, 6 - windshield washer nozzle, 7 - retainer, 8 - cable rod, 9 - hood stop holder, 10 - hood stop, 11 - rubber buffer, 12 - bushing, 13 - sealing of the drainage niche, 14 - stop, 15 - hood seal, 16 - rivet, 17 - hood stop retainer, 18 - washer hose, 19 - retainer
♦ Mark the installation position of the T4 hood.
To do this, circle the bolt heads (see the arrow in Fig. 475) with a felt-tip pen. ♦ While supporting the hood, remove the hinge bolts.
Installation
♦ Screw the hood hinges with bolts in accordance with the marks made earlier, then tighten the bolts to a torque of 10 Nm.
♦ Mount and adjust the height of the rubber buffers (2, fig. 475) so that the hood is flush with the fenders when closed.
Rice. 475 T4 hood hinge bolts
♦ Fasten the hood latch tightly, but not dead, align it in accordance with the marks made earlier, then tighten the fastening bolts with a torque of 10 Nm.
♦ Check that the hood locks easily.
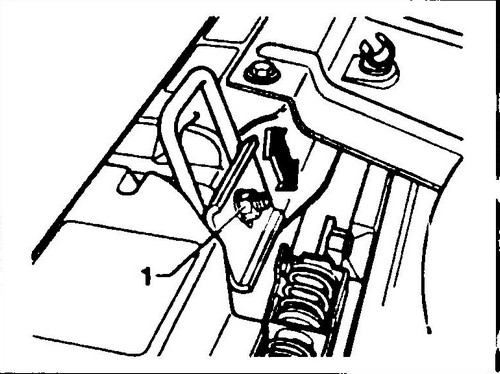
To do this, drop the hood from a height of about 30 cm. The hood should close without additional effort. The perimeter of the hood must match the surface of the fenders. Otherwise, adjust the position of the lock bracket. ♦ Loosen the nut (1, fig. 476) and move the bracket so that the hood locks correctly. Tighten the lug nut to 5 Nm.
Rice. 476 Adjusting the position of the hood latch
